SimLight Golf started as one strip above your screen. Now it can light the side walls and
ceiling around you, so a big miss streaks off the top corner and dies out down the side, and a
hole-in-one sends comets racing around the whole room. Here is exactly what a surround takes,
and how to size it for your bay. In a hurry? Let the setup quiz build your
parts list.
See it
Surround, in a real bay.
Two quick clips from our own bay: a full bay surround, and a surround running right
alongside a second lighting area. A longer walkthrough video is coming soon.
Bay surround: left, top, and right as one canvas.
Surround plus a second lighting area.
Good news
You already own most of it.
If you already run SimLight Golf, going surround is mostly just more strip. The current
4-output controller, the 12.5A power supply, and the same SK6812 strip family drive a full
surround, so you are mainly adding two more runs (the sides) and a few connectors. Going
surround is a free software update: no new license to buy, just the extra hardware to
light the rest of your bay.
Check your controller and supply. The current kit (4-output controller, 12.5A supply)
drives a full three-run surround. Not sure what you have?
Send us a photo.
Step 1
Buy strip to the length you plan to light.
There is really one rule: measure what you want lit, and buy that much strip.
Measure across the top of your screen and down each side you want to light, add it up, and
buy that many ft of strip. Strip comes in 16.4 ft (5m) rolls at about 18 LEDs per foot, and you cut
it to length on the marked lines during install.
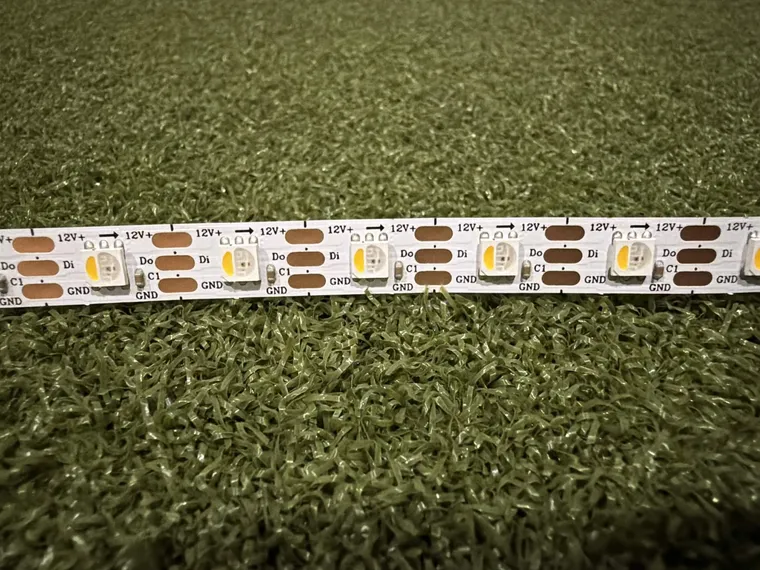
About 18 LEDs per foot. A roll is 300 LEDs and covers about 16.4 ft (5m).
Cut to fit. Each side is cut from a roll on the copper pads between LEDs. Leftover strip is handy for an extra lighting area later.
Keep each run under ~500 LEDs (about 27 ft) for the smoothest motion. More on why in the next section.
The ceiling is 2,000 LEDs total across the whole setup, which is far more than any single lighting area in a bay needs.
Example. A 12 foot wide, 8 foot tall screen, lit on all three sides, is
about 12 + 8 + 8 = 28 feet, so two rolls cut into a top and two sides,
with a bit of slack. Most surrounds take two rolls; a very small screen may fit one, an
oversized wall three. Not sure how many rolls? The quiz works it out
from your screen size.
Cut only on the marked solder lines. The same strip family is used for every side.
Step 2
Three ways to wire it (and the one thing that changes).
Your screen always has three lit zones: left, top, and right. What changes is how many of
the controller's outputs you use to cover them, and that is the one choice that affects how
smooth the motion looks. All three ways work, and SimLight shows you the frame rate you
will get.
One run
Simplest wiring
All three sides daisy-chained into a single output. The fewest wires by far. One long
run sets the pace, so motion slows as the screen gets bigger (a full wrap on a wide
screen can drift toward 30 fps). A great pick for smaller screens or the easiest
install.
Two runs
Smooth on most screens
Two outputs meeting wherever your controller sits. Put it in the top middle and one run
heads each way; put it in a top corner and one run drops down that side while the other
covers the top and the far side. Either way neither run is very long, so the motion stays
crisp on most bays.
Recommended
Three runs
Smoothest, up to 60 fps
Each side on its own output. The runs stay short, so the motion is as crisp as the
hardware allows, all the way up to 60 fps. This is what we steer people toward, and
the 4-output controller has an output to spare for an extra area.
LED strip run Connection point (start of a strip run)
Why it works this way: the controller lights every LED on a run one after another,
so the longest single run sets the frame rate of SimLight's effects. Splitting the sides onto separate
outputs keeps each run short and fast. Under about 500 LEDs per run stays smooth; a single
wrap-around run on a big screen gets long, and slower. You do not have to overthink it: pick
the wiring that suits your bay, and let SimLight tell you the frame rate.
Step 3
Connecting strips, and running longer.
Joining strips is solderless. In-line connectors join two strips end to end (to make
a run longer) and give you a short jumper lead where you need one. Gapless corner
connectors turn the screen corners without a wire jog or any soldering.
The rest of this section is practical guidance, not a lab-tested spec sheet. Every bay
is different. Test your own runs, size for your own load, and follow the safety notice at the
bottom of this page, as well as the manuals and safety procedures of the physical products you
buy.
Most bays never hit any of this: the runs are short and everything just reaches. It only
comes up when the controller has to sit across the room, or a strip runs a long way from
the power supply.
Keep the controller near where the strip starts. The data signal is fast and
degrades over distance, so the short lead should be the data one. Mount the controller
close to the first LED.
Power wire (the +12V and ground legs): heavier wire for longer or brighter runs. A
common rule of thumb is 18 AWG for short runs and 16 AWG (or heavier) once a run
passes roughly 20 feet. 12V handles voltage drop far better than 5V, but a long run
still drops some. If the far end looks dim or off-color, that is voltage drop talking.
Data line, when the controller must sit farther away: extend the data wire with a
single pair from a length of ethernet cable. Cut the ends off and use one conductor for
data and one for ground, connected at both ends. A twisted pair helps keep the signal
clean; a very long data run may still need a level shifter or data buffer.
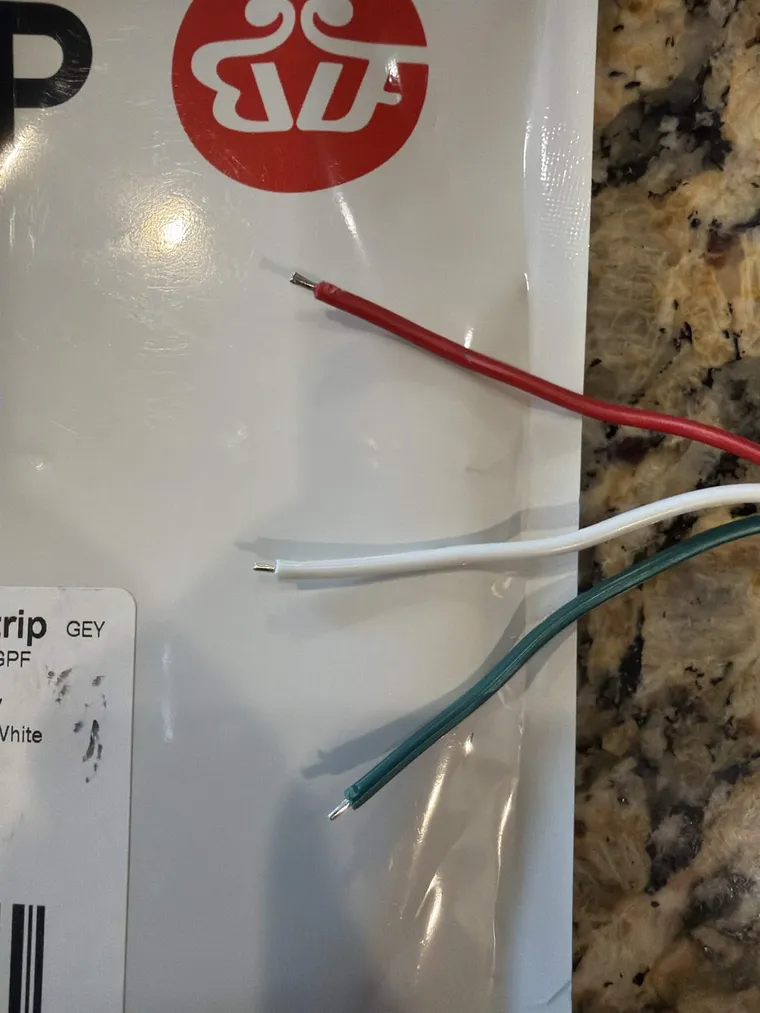
Red = power, white = ground, green = data. Same on every side of the surround.
Some links on this page are affiliate links. If you buy through them, we may earn a
small commission at no additional cost to you. We only link hardware we've tested or
recommend, and the commission doesn't change our recommendations.
Step 4
Power, and where your outlets are.
One supply is usually enough. The 12.5 amp power supply comfortably runs a
typical surround (roughly up to 700 to 750 LEDs). SimLight sets a conservative current limit
for you based on the parts you confirm, so you are not guessing.
Bigger installs can feed power from both ends of a long, bright run, or add a second
supply. If you feed power from two places, there is one thing you must do so the two feeds
do not fight each other:
Feeding power from both ends? Split the +12V rail so the two supplies do not push
against each other. Cut only the +12V (power) pad near the middle of the strip, and
leave the data and ground pads continuous. Keep a common ground everywhere. If that
sentence is new to you, that is exactly the kind of thing to
run past us first.
Plan around your outlets before you buy. Each supply needs an outlet near where it
sits. The tidiest way to reach a far outlet is to keep the power supply near the strip and
run a proper mains-rated extension cord from the wall to the supply, so the low-voltage side
stays short. Where a 12V run to the strip does get long, that is where heavier 16 AWG
wire earns its keep, and where voltage drop shows up. The quiz asks where
your outlets are and factors it into the list.
Give the power supply and controller room to breathe, mount them where they will not cook,
and follow every manufacturer's manual and rating. See the electrical safety notice below.
Beyond the screen
Light more than the screen.
SimLight can light more than your screen. Add a strip around the hitting mat, along a bar
shelf, or behind a TV, and choose what each one shows: mirror the screen, react to
shots only, or hold a steady glow. On its own second controller, an area can
go further and act like its own mini-screen with the shot effects you pick.
There are two ways to add one:
On a spare output of your main controller. After a three-side surround, the
4-output controller still has one output free, ready for one more strip.
On a second WLED controller w/ a second power supply. Add as many as you like; each extra controller drives
one whole strip. You set that controller up in the WLED app yourself and SimLight just
paints it. Each controller runs independently, so one that is powered off or unplugged
never affects the others.
Every extra area gets its own brightness and its own content, so the mat can glow a steady
amber while the screen goes wild on a hole-in-one.
Two easy buttons
Not sure what to buy? Don't overthink it.
Answer a few quick questions about your bay and we will help you put together a parts list
to start from, with quantities and buy links, plus the frame rate each way of wiring gets.
Rather have a human check it? Send a couple of photos of your screen and where your outlets
are, plus a rough sketch or your screen size, to
support@simlightgolf.com or drop it in the
Discord, and we will help you spec the components. We would rather
answer a question up front than have you buy the wrong thing.